Getting Started
This tutorial shows how to use an Ardunio and an Adafruit anemometer to measure wind speed.
Parts List
- Arduino board (we use an Arduino Uno in this tutorial)
- Breadboard
- Wires and alligator clips
- Anemometer Wind Speed Sensor – Adafruit (product ID: 1733)
- Wall adaptor power supply 9 volts (or other power source that can provide between 7 and 24 volts)
Hooking it up
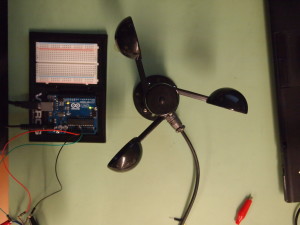
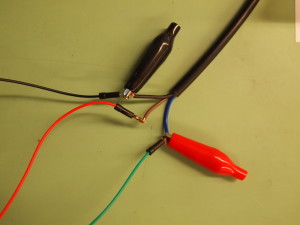
The anemometer connects to the rest of the circuits through a single waterproof cable that bundles three wires. These three wires stick out of the end of the cable, each a different color: brown, black, and blue. The brown wire should be connected to the positive power source. The black should be connected to ground, and the blue is the output for the anemometer.
To more easily connect to the Arduino, wrap each wire from the anemometer around the male terminal of a jumper wire. Secure with an alligator clip (Figure 1).
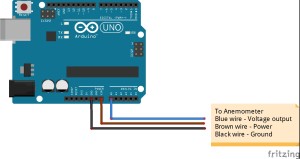
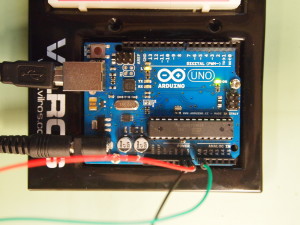
Using the jumper wire, connect the brown wire to the Vin pin (called 9V on some boards). Connect the black wire to one of the ground pins. Connect the blue output wire to one of the analog pins. For this tutorial we used pin A0. Figure 2 shows the circuit diagram for the entire assembly. Figure 3 shows the connections on an actual Arduino Uno.
The anemometer requires a power source between 7V and 24V to produce a measurement. Arduinos use a lower voltage, between 3V and 5V, so the power coming to an Arduino through a USB connection isn’t enough to power the anemometer.
Instead, we’ll use another the external power supply on the board, sometimes labeled X1. This port accepts a female coaxial cable and is appropriate for ranges between 9V and 12V. To use this power source without damaging itself, the Arduino board uses a linear voltage reducer to bring it into the 3V-5V range. However, out anemometer can still access the full voltage if we connect it to the Vin pin (this is why this pin is labeled 9V on some boards).
You can use several sources for the external power supply. One option is to use a standard rectangular 9V battery. However, these batteries are designed for very low current uses for long periods of time (in smoke detectors, for example). The Arduino and anemometer will quickly use up the charge in the battery, leading to fluctuating voltages and bad readings from the sensor. The better option is to buy a wall adapter that produces 9V of steady, higher current power.
Once the wiring is complete and the external power source is connected, the hardware is ready to go. Lets get the software side up and running and measure some wind!
Software
The code for this tutorial takes the voltage output from the anemometer and uses the technical specs from Adafruit to convert the voltage into a wind speed. The anemometer is designed to output voltage between 0.4V and 2V. A value of 0.4V represents no wind and 2V represents a wind speed of 32.4 m/s. The relationship between voltage and wind speed is linear, meaning that each increase of 0.1V represents an increase of 2.025 m/s in wind speed. The following code maps the output values from the anemometer to wind speed using these values.
The Script
|
1 2 3 4 5 6 7 8 9 10 11 12 13 14 15 16 17 18 19 20 21 22 23 24 25 26 27 28 29 30 31 32 33 34 35 36 37 38 39 40 41 42 43 44 45 46 47 48 49 50 51 52 53 54 55 56 57 58 59 60 61 62 63 64 65 66 67 |
/* Anemometer Tutorial This code takes the output from an Adafruit anemometer (product ID 1733) and converts it into a wind speed. The circuit: Created 11 November 2014 By Joe Burg Modified 11 November 2014 By Joe Burg Hardware instructions and background information can be found at: http://www.hackerscapes.com/2014/11/anemometer/ Special thanks to Adafruit forum users shirad and adafruit_support_mike for help in trouble shooting code and hardward, including provided code of their own for comparison and inspiration. */ //Setup Variables const int sensorPin = A0; //Defines the pin that the anemometer output is connected to int sensorValue = 0; //Variable stores the value direct from the analog pin float sensorVoltage = 0; //Variable that stores the voltage (in Volts) from the anemometer being sent to the analog pin float windSpeed = 0; // Wind speed in meters per second (m/s) float voltageConversionConstant = .004882814; //This constant maps the value provided from the analog read function, which ranges from 0 to 1023, to actual voltage, which ranges from 0V to 5V int sensorDelay = 1000; //Delay between sensor readings, measured in milliseconds (ms) //Anemometer Technical Variables //The following variables correspond to the anemometer sold by Adafruit, but could be modified to fit other anemometers. float voltageMin = .4; // Mininum output voltage from anemometer in mV. float windSpeedMin = 0; // Wind speed in meters/sec corresponding to minimum voltage float voltageMax = 2.0; // Maximum output voltage from anemometer in mV. float windSpeedMax = 32; // Wind speed in meters/sec corresponding to maximum voltage void setup() { Serial.begin(9600); //Start the serial connection } void loop() { sensorValue = analogRead(sensorPin); //Get a value between 0 and 1023 from the analog pin connected to the anemometer sensorVoltage = sensorValue * voltageConversionConstant; //Convert sensor value to actual voltage //Convert voltage value to wind speed using range of max and min voltages and wind speed for the anemometer if (sensorVoltage <= voltageMin){ windSpeed = 0; //Check if voltage is below minimum value. If so, set wind speed to zero. }else { windSpeed = (sensorVoltage - voltageMin)*windSpeedMax/(voltageMax - voltageMin); //For voltages above minimum value, use the linear relationship to calculate wind speed. } //Print voltage and windspeed to serial Serial.print("Voltage: "); Serial.print(sensorVoltage); Serial.print("\t"); Serial.print("Wind speed: "); Serial.println(windSpeed); delay(sensorDelay); } |
Thanks!
Thanks to the rest of the Particle Wave team for their review of the wiring and code for this tutorial. Special thanks to Adafruit forum users shirad and adafruit_support_mike for help in trouble shooting code and hardward, including provided code of their own for comparison and inspiration.
Thanks for the write up on this anemometer. I am hoping to use this same anemometer in our corn dryer. What I would like to do is use this set up but have a readout on a small lcd display. Perhaps something like this https://learn.adafruit.com/rgb-lcd-shield. Do you know if it is possible to run this anemometer through the Arduino to an lcd display that will read in mph? I am a beginner when it comes to all this stuff so if you have any advice please explain it to me like I’m 5. 🙂
What does ‘<’ represents in this line of code:
if (sensorVoltage <= voltageMin){
Thanks
I think it’s caused by a quirk in HTML showing the ‘less than’ symbol character codes rather than the symbol ‘<' itself. There's probably a system of escape characters that should have been used.
Have you managed to get the anemometer to work? I haven't with mine. i get the minimum voltage of .40 in the serial monitor but no detection or change when the cups are rotated.
Is there a typo on line 53 of the featured code? Are the characters < wrong?
Thanks
I had to comment out that ‘if’ to get things going, and I never received an answer from the author about the ‘<’ reference.
< is equivalent to
Thanks for that suggestion Chuck about commenting out the if statement. Were you having problems getting output from the device before that?
I will definitely give it a try. The typo took me a bit to work out as the less than sign but if it works without the line of code, even better.
I couldn’t get readings until the if statement was removed.
Thanks, Chuck. I took out the if statement and started to get readings. I think the error is in ‘hard-coding’ voltageMin at 0.4. On my rig, the voltage is measuring 0.38 when the anemometer is at rest so the is will never resolve properly, of course; wind speed will always be zero. The original values were probably worked out against different power supply ratings.
The next thing I’ll try to think about is calibration against the new voltageMIn value.
Your thoughts were much appreciated.
Paul
Hey there Paul. Mind if you share the coding that you have modified here? I do not know how to exclude the ‘If’ statement like you said.
/*
Anemometer Tutorial
This code takes the output from an Adafruit anemometer (product ID 1733) and converts it into a wind speed.
The circuit:
Created 11 November 2014
By Joe Burg
Modified 11 November 2014
By Joe Burg
Modified 04 June 17
By Paul Mckillop
If statement out and threshold stated for standstill on my sensor
Hardware instructions and background information can be found at: http://www.hackerscapes.com/2014/11/anemometer/
Special thanks to Adafruit forum users shirad and adafruit_support_mike for help in trouble shooting code and hardward, including provided code of their own for comparison and inspiration.
*/
//Setup Variables
const int sensorPin = A0; //Defines the pin that the anemometer output is connected to
int sensorValue = 0; //Variable stores the value direct from the analog pin
float sensorVoltage = 0; //Variable that stores the voltage (in Volts) from the anemometer being sent to the analog pin
float windSpeed = 0; // Wind speed in meters per second (m/s)
float voltageConversionConstant = .004882814; //This constant maps the value provided from the analog read function, which ranges from 0 to 1023, to actual voltage, which ranges from 0V to 5V
int sensorDelay = 1000; //Delay between sensor readings, measured in milliseconds (ms)
//Anemometer Technical Variables
//The following variables correspond to the anemometer sold by Adafruit, but could be modified to fit other anemometers.
float voltageMin = .4; // Mininum output voltage from anemometer in mV.
float windSpeedMin = 0; // Wind speed in meters/sec corresponding to minimum voltage
float voltageMax = 2.0; // Maximum output voltage from anemometer in mV.
float windSpeedMax = 32; // Wind speed in meters/sec corresponding to maximum voltage
void setup()
{
Serial.begin(9600); //Start the serial connection
}
void loop()
{
sensorValue = analogRead(sensorPin); //Get a value between 0 and 1023 from the analog pin connected to the anemometer
sensorVoltage = sensorValue * voltageConversionConstant; //Convert sensor value to actual voltage
windSpeed = (sensorVoltage – voltageMin)*windSpeedMax/(voltageMax – voltageMin) + .38; //For voltages above minimum value, use the linear relationship to calculate wind speed
/*
//Convert voltage value to wind speed using range of max and min voltages and wind speed for the anemometer
if (sensorVoltage = voltageMin){
windSpeed = 0; //Check if voltage is below minimum value. If so, set wind speed to zero.
}else {
windSpeed = (sensorVoltage – voltageMin)*windSpeedMax/(voltageMax – voltageMin); //For voltages above minimum value, use the linear relationship to calculate wind speed.
}
*/
//Print voltage and windspeed to serial
Serial.print(“Voltage: “);
Serial.print(sensorVoltage);
Serial.print(“\t”);
Serial.print(“Wind speed: “);
Serial.println(windSpeed);
delay(sensorDelay);
}
Thank you so much to answering to my question.
How do I hook up the numerical display to see my wind speed ?
hi friends
Its very useful to me. i purchased adafruit wind speed sensor. I want to monitor the wind speed on my location.
Is there any restriction in using length of wire for this application?
If installed it on the rooftop, where could be kept the arduino board.
how much length can be used from sensor to board.? is there any electrical drawback on using lengthy wire?
Hello to Everyone,
A little help please, I am designing a hot wire anemometer based on arduino. (using a NTC [as temp increases, resistance decreases] thermistor and a another precision resistor as a hot wire source) How do I convert the different voltage values into wind speed of metres per second? Can the above program be adapted? I’m rather new to all this and will be using Arduino Uno. I only need to read from 0 – 10 metres per second, but need to do this accurately in increments of 0.1 metres per second. Any help or comments greatly appreciated
regards
Andrew
hi,
the code above is based on a number of constants given by adafruit (so you will need to know yours)
f.e. the adafruit anemometer can go up to 32 m/s.
we measure a value between 0 and 1023 max on the analog pin (0 to 5v).
in other words we divide the number by 5 to know its voltage per value: 1023/5 = 204.6 ; 1/204.6 = .0048875
in other words for every number that we read out on the pin it represents 0.0048875 volts.
between 0 and 80 the number is lower then 0.4 so no wind.
you will need to map the same for your anemometer.
kr
Wim
Can this sensor be used with a Raspberry Pi instead of an Arduino? I have a doubt because this sensor provides Analog voltage output and GPIO pins in Raspberry Pi are digital
indeed, but you can link your arduino to your raspberry
if the only goal is to have an uplink to the web then buy an ethernet shield to go on the arduino much easier 😉
The code looks perfect however,
I get an error message Arduino: 1.6.12 (Windows 7), Board: “Arduino/Genuino Uno”
sketch_mar10a:28: error: stray ‘\342’ in program
windSpeed = (sensorVoltage – voltageMin)*windSpeedMax/(voltageMax – voltageMin) + .38; //For voltages above minimum value, use the linear relationship to calculate wind speed
^
sketch_mar10a:28: error: stray ‘\200’ in program
sketch_mar10a:28: error: stray ‘\223’ in program
sketch_mar10a:28: error: stray ‘\342’ in program
sketch_mar10a:28: error: stray ‘\200’ in program
sketch_mar10a:28: error: stray ‘\223’ in program
sketch_mar10a:38: error: stray ‘\342’ in program
Serial.print(“Voltage: “);
^
sketch_mar10a:38: error: stray ‘\200’ in program
sketch_mar10a:38: error: stray ‘\234’ in program
sketch_mar10a:38: error: stray ‘\342’ in program
sketch_mar10a:38: error: stray ‘\200’ in program
sketch_mar10a:38: error: stray ‘\234’ in program
sketch_mar10a:40: error: stray ‘\342’ in program
Serial.print(“\t�);
^
sketch_mar10a:40: error: stray ‘\200’ in program
sketch_mar10a:40: error: stray ‘\234’ in program
sketch_mar10a:40: error: stray ‘\’ in program
sketch_mar10a:40: error: stray ‘\342’ in program
sketch_mar10a:40: error: stray ‘\200’ in program
sketch_mar10a:40: error: stray ‘\235’ in program
sketch_mar10a:41: error: stray ‘\342’ in program
Serial.print(“Wind speed: “);
^
sketch_mar10a:41: error: stray ‘\200’ in program
sketch_mar10a:41: error: stray ‘\234’ in program
sketch_mar10a:41: error: stray ‘\342’ in program
sketch_mar10a:41: error: stray ‘\200’ in program
sketch_mar10a:41: error: stray ‘\234’ in program
C:\Users\ROBERT~1\AppData\Local\Temp\untitled1825183719.tmp\sketch_mar10a\sketch_mar10a.ino: In function ‘void loop()’:
sketch_mar10a:28: error: expected ‘)’ before ‘voltageMin’
windSpeed = (sensorVoltage – voltageMin)*windSpeedMax/(voltageMax – voltageMin) + .38; //For voltages above minimum value, use the linear relationship to calculate wind speed
^
sketch_mar10a:38: error: ‘Voltage’ was not declared in this scope
Serial.print(“Voltage: “);
^
sketch_mar10a:40: error: ‘t’ was not declared in this scope
Serial.print(“\t�);
^
sketch_mar10a:41: error: ‘Wind’ was not declared in this scope
Serial.print(“Wind speed: “);
^
exit status 1
stray ‘\342’ in program
This report would have more information with
“Show verbose output during compilation”
option enabled in File -> Preferences.
the error is due to the copy paste characters
you need to rewrite the ” ” and the – signs in the code.
How much power it needed? Can i power it
from mA range current
I am using a different Rotary Encoder, will that alter with how the code is written?
I tried the first code and got this error message:
Arduino: 1.8.6 (Windows Store 1.8.14.0) (Windows 10), Board: “Arduino/Genuino Uno”
C:\Users\hamis\AppData\Local\Temp\arduino_modified_sketch_922772\sketch_sep04a.ino: In function ‘void loop()’:
sketch_sep04a:53:20: error: ‘lt’ was not declared in this scope
if (sensorVoltage <= voltageMin){
^
sketch_sep04a:53:22: error: expected ‘)’ before ‘;’ token
if (sensorVoltage <= voltageMin){
^
sketch_sep04a:53:23: error: expected primary-expression before ‘=’ token
if (sensorVoltage <= voltageMin){
^
sketch_sep04a:55:2: error: ‘else’ without a previous ‘if’
}else {
^
exit status 1
‘lt’ was not declared in this scope
This report would have more information with
“Show verbose output during compilation”
option enabled in File -> Preferences.
I also tried the code that another user posted
got a different error message:
Arduino: 1.8.6 (Windows Store 1.8.14.0) (Windows 10), Board: “Arduino/Genuino Uno”
sketch_sep04b:33:1: error: stray ‘\226’ in program
windSpeed = (sensorVoltage – voltageMin)*windSpeedMax/(voltageMax – voltageMin) + .38; //For voltages above minimum value, use the linear relationship to calculate wind speed
^
sketch_sep04b:33:1: error: stray ‘\226’ in program
sketch_sep04b:43:1: error: stray ‘\223’ in program
Serial.print(“Voltage: “);
^
sketch_sep04b:43:1: error: stray ‘\223’ in program
sketch_sep04b:45:1: error: stray ‘\223’ in program
Serial.print(“\t”);
^
sketch_sep04b:45:1: error: stray ‘\’ in program
sketch_sep04b:45:1: error: stray ‘\224’ in program
sketch_sep04b:46:1: error: stray ‘\223’ in program
Serial.print(“Wind speed: “);
^
sketch_sep04b:46:1: error: stray ‘\223’ in program
sketch_sep04b:1:2: error: expected unqualified-id before ‘/’ token
*/
^
sketch_sep04b:1:2: error: expected constructor, destructor, or type conversion before ‘/’ token
C:\Users\hamis\AppData\Local\Temp\arduino_modified_sketch_822806\sketch_sep04b.ino: In function ‘void loop()’:
sketch_sep04b:29:26: error: ‘sensorPin’ was not declared in this scope
sensorValue = analogRead(sensorPin); //Get a value between 0 and 1023 from the analog pin connected to the anemometer
^
sketch_sep04b:33:30: error: expected ‘)’ before ‘voltageMin’
windSpeed = (sensorVoltage – voltageMin)*windSpeedMax/(voltageMax – voltageMin) + .38; //For voltages above minimum value, use the linear relationship to calculate wind speed
^
sketch_sep04b:43:15: error: ‘Voltage’ was not declared in this scope
Serial.print(“Voltage: “);
^
sketch_sep04b:45:16: error: ‘t’ was not declared in this scope
Serial.print(“\t”);
^
sketch_sep04b:46:15: error: ‘Wind’ was not declared in this scope
Serial.print(“Wind speed: “);
^
exit status 1
stray ‘\226’ in program
This report would have more information with
“Show verbose output during compilation”
option enabled in File -> Preferences.
I am very new to arduino and coding so if you can use as much simple language and have patients that would be awesome
Cheers
Hey, I have a question. I have a anemometer that only has two wires. I’ve tried to set it for my arduino, but failed. Can someone help me??
Every example I found is 3 wire sensors, but there are a lot of 2 wire sensors out there. How do you do your project with 2 wire sensor?