This tutorial allows you to turn environmental data, in this case the amount of light in the setting you are working in, into an on/off switch for LED lights. This tutorial is a precursor to a more complicated setup that will be deployed for turning data gathered by a weather shield into conditions for selecting functions on a Raspberry Pi.
Tutorial Parts List:
- Arduino UNO (1)
- Breadboard (1)
- Photo resistor (1)
- Jumper wires (7)
- 10k Ohm resistor (1)
- 330 Ohm resistor (2)
- Red LED (1)
- Yellow LED (1)
Arduino Setup:
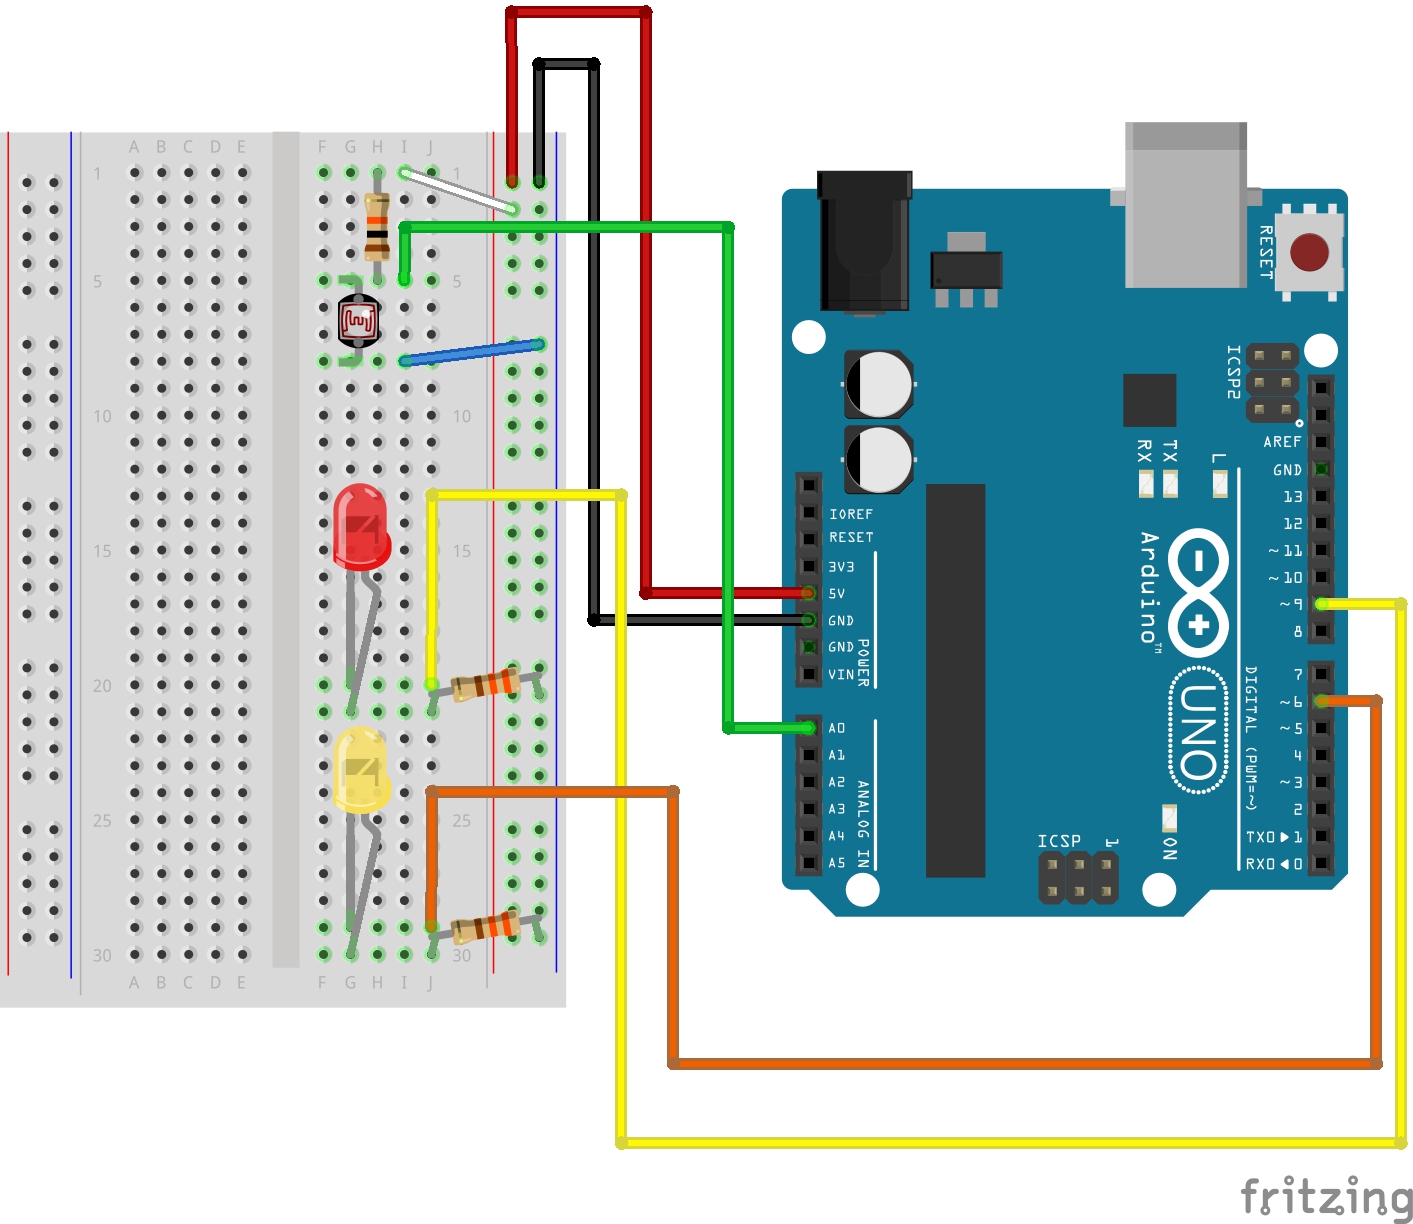
Let’s start by setting up the hardware on our Arduino board. Note: the short leg (the negative side) of the LED lights should be below the long leg (the positive side) in this setup. Use the following diagram to guide your setup:
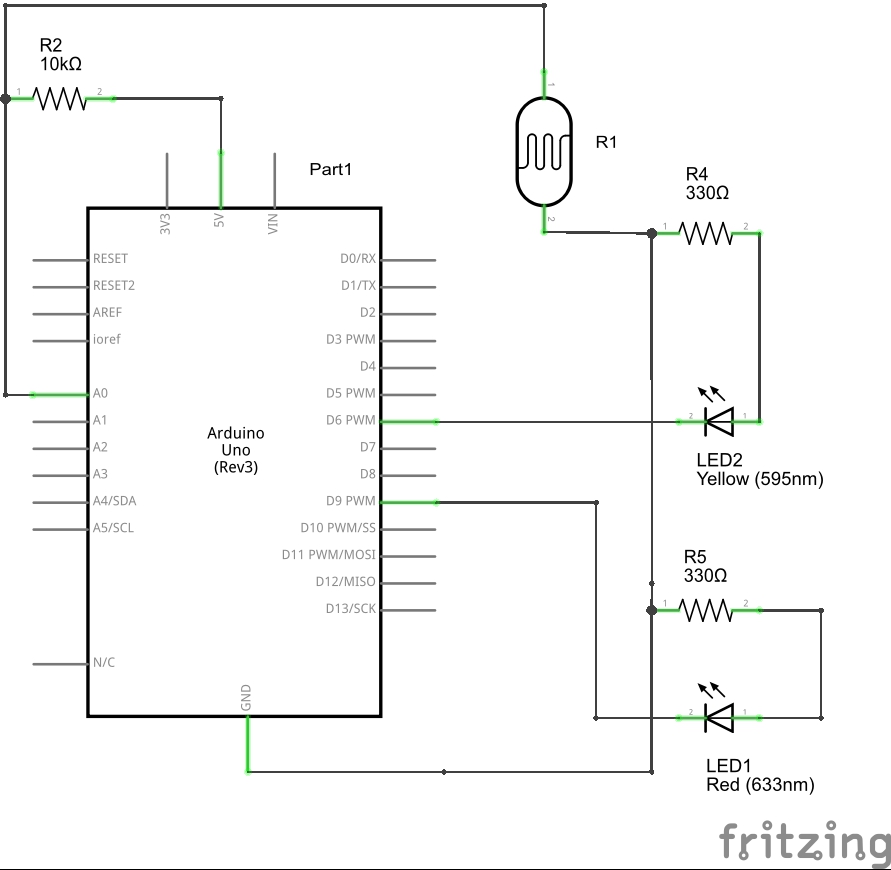
You may also find the following circuit diagram helpful for your setup:
Coding:
Once you have your board set up, it’s time to enter our code into Arduino. What we are looking to accomplish here is getting our Arduino to sense the level of light in the environment, and use that input to determine which LED light should turn on or off. This tutorial could be altered in many ways, you could use only one LED, and simply have that light turn on/off according to light level. You can also alter the level of brightness/darkness Arduino will use to determine whether the LED(s) should be turned on or off.
|
1 2 3 4 5 6 7 8 9 10 11 12 13 14 15 16 17 18 19 20 21 22 23 24 25 26 27 28 29 30 31 32 33 34 35 36 37 38 39 40 41 42 43 44 45 46 47 48 49 50 51 |
// Tutorial: How to turn environmental light conditions into a LED power switch // First we need to declare constants to name the pins we will be using. // This will allow us to call our pins by name in the sketch. const int sensorPin = 0; // Our photo resistor must connected to an analog pin (A0) const int redledPin = 9; // Our red LED pin const int yellowledPin = 6; // Our yellow LED pin const int switchPoint = 200; // Here we must declare a value to act as our switching // point to determine when to turn the LEDs on and off // playing with this value will change how dark or light // must be for the lights to switch on/off. Pick a value // between the range of 0 and 255. int lightLevel; // Declare a global variable for light level void setup() { pinMode(redledPin, OUTPUT); // First we need to set up both LEDs to be outputs. pinMode(yellowledPin, OUTPUT); } void loop () { // To begin our void loop, we tell Arduino to determine // the value of lightLevel by using the analogRead() // function. This function measures the incoming voltage // from the photo resistor (connected to our sensorPin.) // The photo resistor relays this information to our analog // pin in a range of 0 to 1023 (0 to 5 volts). lightLevel = analogRead(sensorPin); // Next we must create an if/else statement to set up the // parameters for our switch. In this case, we are telling // Arduino that if the lightLevel is less than the value of // our switch point, keep the red LED off and turn the yellow // LED on. if (lightLevel < switchPoint) { digitalWrite(redledPin, HIGH); digitalWrite(yellowledPin, LOW); } // if the lightLevel does not represent the above condition // (if the lightLevel is greater than the value of the // switchPoint) then the red LED will turn on and the yellow // LED will turn off. else { digitalWrite(redledPin, LOW); digitalWrite(yellowledPin, HIGH); } } |
The following video illustrates what you should see when you are finished! I used a small keychain light to demonstrate the change of the LED lights under different light conditions. As mentioned earlier, you can alter the light level needed to switch the LEDs on/off in the code.